

“If you have a garden and a library, you have everything you need.” – Marcus Tullius Cicero
Confession: I love libraries, but there are few things I fear more than gardening… And most of those other things I fear reside in gardens (spiders, lizards, and snakes – I have the Indiana Jones in the snake pit reaction). Like most people, what’s ultimately kept me from gardening in the past is a fear of failure.
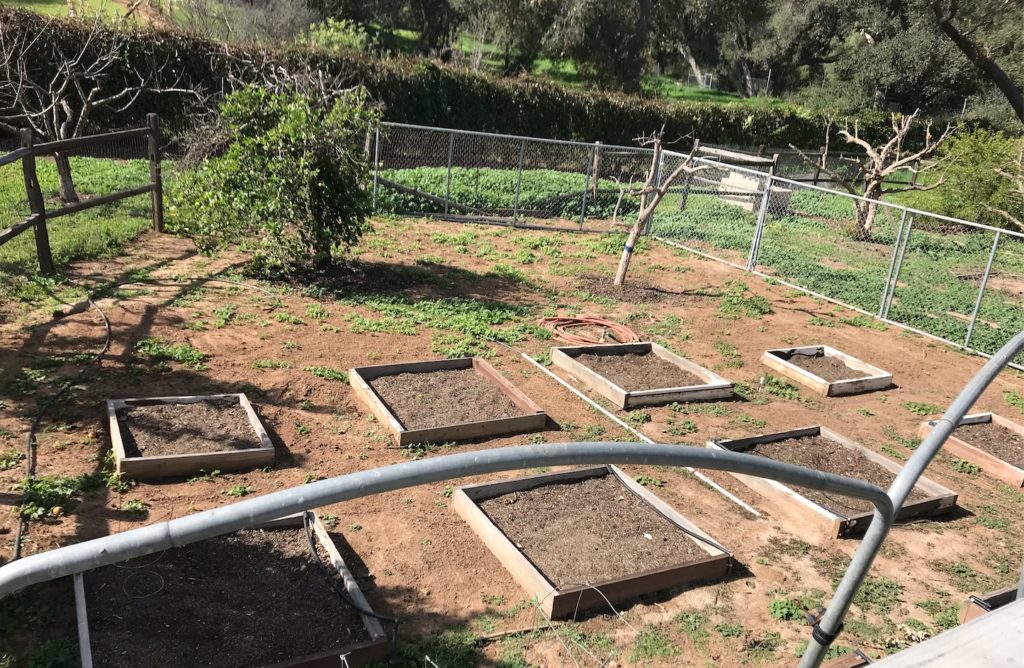
I don’t come from a long line of gardeners, and I’ve always struggled to keep plants alive, in fact, my history with plantlife has earned me the title of “black thumb”. I’m the woman who buys a basil plant from Traders Joes, sets it by the sink and then slowly watches it die. When my husband and I purchased a 1975 ranch home with a couple of acres and big designated garden space in Fallbrook Ca, you can probably guess which area that I avoided like the plague. But as friends and family began touring our property, I started to see the neglected 900 square foot area in a new light. I was encouraged by every visitor’s motivating observation, “those garden beds are in pretty good shape,” “oh, you’ve got irrigation!” and “once you get this all cleaned up, think of the healthy meals you’ll be having.”
Suddenly, what was an eyesore and project too big to tackle, became our mission. It’s ambitious, overwhelming and downright intimidating, but my family and I are committed to breathing new life into this rusty old garden. And after a bit of trial and error, we have implemented a 5 step plan for our garden rejuvenation.
Step One: Get Out of the Weeds
We tackled the garden cleanup after a string of heavy rains, so we had a great deal of weed abatement. Spoiler Alert! It got worse before it got better. Our goal for the weeds was to work “smarter, not harder” but come to find, there is no real shortcut when it comes to getting those buggers out of the garden for good. We weighed our weed elimination options: solarization, weed whacking, pulling out by the roots and my favorite option, GOATS! When I found out that you can “hire a herd” of goats to come to trim up your landscape, I just about called everyone I knew. While I didn’t grab the goats on this initial clean-up, I plan to reach out to Elm Goats in the future.

We ended up soaking the weeds, ensuring wet roots, and then chopping them with the weed whacker. We then left them as ground cover for several days and sprayed to kill the entire weed. It’s essential to me to keep our food away from dangerous pesticides and sprays, so I searched for a natural, homemade recipe that would kill the weeds without harming our kids or pets. After spraying, we waited about a week to then rake and ultimately, pull the remainder of the dead weeds.
If you’re looking for nature’s ultimate weed solution, get a goat. All my research came back to these incredible creatures. Mountain, prairie, garden big or small, goats can clear your area and fertilize your soil with little maintenance. A WIN-WIN! Elm Goats can deliver an all-terrain herd to your property and have the cleanup completed in no time.
3 ingredients organic weed killer
I found a natural and effective recipe for killing weeds on Creative Cain Cabin after some late-night Pinterest pinning to ease my mind and keep harsh chemicals out of our garden.
– 1 Gallon of Vinegar, 1/2 cup of Salt, and a squirt of Dish-soap
Step Two: Take an Inventory
After we had a somewhat clean slate (we could see past the weeds), we could take an inventory of what we had and what we could donate or throw away. I was shocked by what clutter laid beneath the brush. We cleared out rusted unusable tools and unwanted debris, i.e., extra wood or stakes, labels, and cages, then checked perimeter fencing and planter boxes for termites and repairs. It became quickly apparent that we were not alone in our newly cleared garden. The birds, gophers and ground squirrels had taken up semi-permanent residence, and we began to evaluate how we could discourage critters and pests. With a little help from the sun, we found a natural product that keeps our feathered and furry friends away without poisons or traps.
The Solar Yard Gard sells for $20 on Amazon and is a practical solution to our unwanted visitors.

Step Three: Tend to Existing Beds and Trees
One of the goals we set at the beginning of our gardening journey, was preserving existing trees and plant life in the garden. While there was only a handful of living lime and persimmon trees in our enclosure, we wanted to make sure we didn’t lose what had survived in a previously abandoned environment (those little guys were fighters!). Nothing from our raised beds could be saved, but the trees still had a shot. With some pruning, compost, mulch and necessary soil evaluation, we found three of the five trees to be salvageable.

The big question at this point was, do we need to start from scratch or could the soil be saved? My husband took the lead in the soil department, researching what kind of “dirt cocktail” was needed to help our future vegetables and trees survive. We didn’t have a back stock of compost or fertilizer, so we sought out those essentials and mixed it in with the soil in the existing beds.
Inika Small Earth is a great local resource, who both teaches and offers an incredible local product for farmers in Southern California.
Step Four: Manage Irrigation
I’m not going to sugar-coat this; the existing irrigation was in pretty bad shape. We set some goals to simplify, repair and prepare, but it was a challenge considering many of the irrigation lines did not function, and the majority were linked to a non-working system. The restoration of leaky hoses and the replacement of small nozzles didn’t take too much time and effort. However, it took days to connect the newly repaired lines to one operating system. Now it’s as simple as turning the main switch and the entire garden waters correctly. After we worked out kinks, we researched watersmartsd.org to find our area’s limitations and regulations before we nailed down a schedule and plot plan. And of course, don’t underestimate the power of a 5-year-old with an old fashioned watering can! Everybody in this family works in this garden!
Step Five: Set up Storage
There’s nothing worse than having to stop mid-project to search for the right tool. We quickly learned the value of having our tools on-hand and in a designated area where they would be organized and out of the elements of weather. I wanted to be very budget-conscious going into this clean-up because, after all, we still hadn’t planted vegetables or even paid a water bill, but ultimately, I see our garden tools as investments in our commitment to our garden; therefore, it is vital to store and care them properly. You can go crazy when investing in a garden shed, but for us small and reliable was best. Check out this Rubbermaid Big Max 2 ft. 3 in. x 4 ft. 3 in. Large Vertical Resin Storage Shed available on Amazon for $350.
So, we’ve cleaned up, and were there some rough spots- some mini-failures? You bet, and we learned from every one of them. But, as Hockey Great, Wayne Gretsky once said: “ You miss 100% of the shots you never take.” … so here we go, we’re taking our shot!
We are a participant in the Amazon Services LLC Associates Program, an affiliate advertising program designed to provide a means for us to earn fees by linking to Amazon.com and affiliated sites